


Once you have found the right lifepo4 battery for your motorhome, it is time to install it. But how does this actually work and what is there to consider?
On the way with the camper to the next resort you take a break, want to make yourself a coffee and charge your smartphone? Especially if the engine of the motorhome is not running, the electricity for electronic devices must be obtained via other routes. With rechargeable batteries, you can support and ensure your power supply during your journey. For this purpose, the battery should cope with temperature fluctuations and high currents, tolerate low discharges and be gassing-free. Off-grid solar solutions for Camper Vans are definitely of interest to you.
Once you have found the right lifepo4 battery for your motorhome, it is time to install it. But how does this actually work and what is there to consider?
Safely installing the utility battery: Here's how it works
In general, secondary batteries should always be installed independently of the starter battery. Due to the strict separation between the two batteries by means of relays, the discharge of the starter battery is prevented.
Here we explain how to install an on-board battery correctly!
1. The optimal place to install
Often a device under the driver's seat is provided for the surface-mounted battery. Basically, however, there is not one perfect place to install the battery.
Ideally, the battery is close to the starter battery and preferably in such a way that it is not in the way. The area under the driver's seat, the luggage compartment or engine compartment are suitable for this.
2. Inserting the battery
Before using the on-board battery, be sure to turn off the electrical system or solar generator system!
In the best case, place the battery in the device provided for this purpose. If there is none in your motorhome, you can also get and install a battery holder for better stabilization.
3. This is how to connect the second battery
Depending on the battery type, it is also important to ensure an appropriate position when inserting. Lithium batteries can be installed in any conceivable position. They also tolerate inclinations. Lead-acid batteries, on the other hand, should always be installed upright because of the risk of acid leakage. AGM batteries and GEL batteries also do not tolerate every installation position and must be placed upright.
After you have inserted the battery, it is now time to connect. To do this, connect the plus cable to the positive terminal and only then the minus cable to the negative terminal. Make sure that the two contacts do not touch each other. For better protection, you can cover the positive pole with a pole cover after connecting the cables.
If your project is self-assembling, you must lay suitable power cables before inserting and connecting.
4. Good fastening for safety in the camper
So that your on-board battery does not slip during acceleration, strong braking or on uneven paths, you should secure the battery sensibly. It is best to attach the battery with safety or tension belts, which are anchored in the floor of the vehicle and equip them with sufficient padding all around.
This ensures a firm and stable fit of the on-board battery!
5. Connect the consumer to the power source
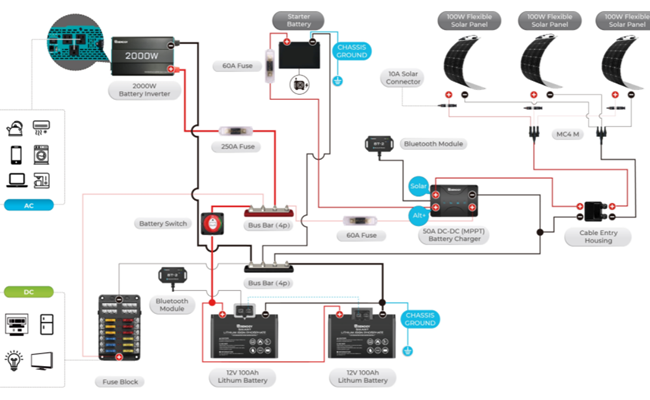
Are you in the middle of the "Camper Self-Expansion" project? Then, as you expand your electronics, you also need to connect the electronic consumers to your power source. Put simply, all your devices are connected via power cables to a fuse box that connects to the battery.
To do this, connect all the plus lines of the electronic devices to the fuses of the fuse box and the minus lines are collected on a neutral conductor terminal, which you can also store in the fuse box. The supply battery is connected to the fuse box by means of your plus cable and thus distributes the power to your devices.
So that the electricity never runs out
Finally: The utility battery is installed in your camper and you can travel! However, in order for the second battery to provide you with long and reliable services, you should always pay attention to regular recharging. And use a dedicated battery charger to charge your battery. This allows you to prevent deep discharge and damage to the battery.
There are various ways to charge the charging process: On the one hand, you can recharge the surface-mounted battery via the alternator or generator and on the other hand via shore power, a solar powered generator system, a gasoline generator or a fuel cell. We require charging by shore power or alternator, as these processes correspond to the basic equipment of most campers.
Charging via shore power
In this process of charging your RV battery, you usually only need a suitable charger. You can then simply connect this with an extension cable to your outdoor socket on the camper and via a fixed mains socket at the parking space.
Charging via the generator
When charging via the vehicle's alternator, the utility and starter batteries should be connected in parallel as far as possible so that charging while driving is possible. However, when installing the second battery, you should make sure that you switch a disconnecting relay between the two batteries.
Function of an isolating relay
On the one hand, the supply of starter and supplier batteries during charging is regulated via the isolating relay, on the other hand, it separates the batteries as soon as the motor is switched off to protect against discharge of the starter battery. So it is definitely recommended to install such a disconnecting relay.
Charging booster vs. isolating relay
An even better alternative to the isolating relay is a charging booster, which takes over the battery charge while driving. It uses the current of the starter battery and feeds it into the build-up battery exactly according to the charging characteristic. The charging booster also has two decisive advantages:
Battery monitor can monitors the voltage of the starter battery and only draws power from it when the starter battery is sufficiently charged.
The on-board battery can never be overcharged, as the charging booster stops charging with sufficient charge and switches to trickle charger mode, which can charge a completely billed battery at a rate equal to its self-discharge price, hence making it possible for the battery to continue to be at its completely charged degree.

Tatiana is the news coordinator for TravelDailyNews Media Network (traveldailynews.gr, traveldailynews.com and traveldailynews.asia). Her role includes monitoring the hundreds of news sources of TravelDailyNews Media Network and skimming the most important according to our strategy.
She holds a Bachelor's degree in Communication & Mass Media from Panteion University of Political & Social Studies of Athens and she has been editor and editor-in-chief in various economic magazines and newspapers.